Table of Contents
A Networking Lab on QoS for Less Than 50 Dollars
-. Context and Alternatives
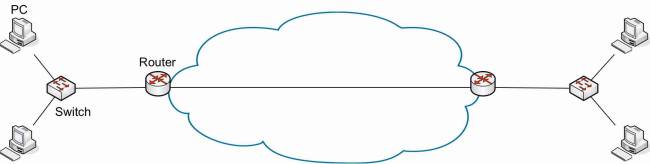
During my teaching experience at the University, I wanted to deploy a testing platform for a networking lab that enables to explore Quality of Service (QoS) mechanisms. The basic topology is presented in Fig. 1. For years, I used Cisco routers and was (more than) happy with the result. Students captured the concepts of congestion in IP networks, analyzed the difference between UDP and TCP transport, and assessed the impact of DiffServ mechanisms in providing guaranteed performance. Le tour est joué.
Recently, I added some constraints on this networking lab: suppose that it should cost less than 50 dollars. Indeed, I wanted a portable platform students can take home for projects, preferably with low cost material, and ideally with hackable software. Obviously, I started to search for a replacement of the commercial routers. In the following table, I mention some of the many ideas I explored or tested to replace these routers.
| Proposed solution | Main advantage | Main drawback |
|---|---|---|
| Emulated routers with GNS3 | Cisco CLI | Proprietary Cisco IOS |
| Mininet emulated Linux routers | Low Cost | Poor performance at high throughput |
| NS simulation | Low Cost | Simulated traffic |
| Real PCs with Linux OS | Open software | high cost and lack of portability |
| Raspberry Pi | Low cost | Single Ethernet interface |
Note that, I already use (extensively) some of these solutions (RPI, Mininet, GNS3) in other courses. However, for my QoS testing platform, none of the proposed solutions met all the criteria.
-. Hardware

-. Software
Install and compile netperf:
wget https://github.com/HewlettPackard/netperf/archive/master.zip
unzip master .zip
cd netperf-master/
./configure --enable-demo=yes
make
make install
Install matplotlib and fping
apt-get install fping
apt-get install python-qt4
pip install matplotlib
Install flent
pip install flent
Install VLC as in this tutorial.
-. Addressing
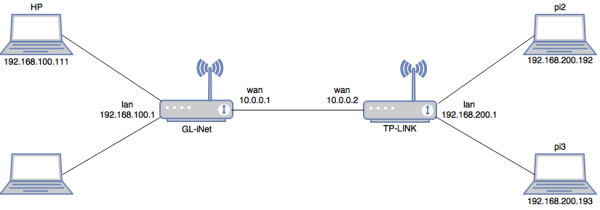
the addressing plan of the platform is shown in Fig. 2. Both routers have static addresses on their wan and lan interfaces. DHCP is activated on the LAN interfaces and static leases are configured so as to obtain the addresses on the terminals according to the figure.
-. Access and Configuration
SSH is activated on the two Raspberry Pi devices connected to the TP-LINK router. Thus, they can be accesses by typing ssh pi@ip_address on any terminal. The default password is raspberry and the pi user is a sudoer. For advanced debugging, an HDMI cable is available so you can connect the Pi to a display monitor.
For both routers, SSH is also activated, and they can be accessed by any SSH client on the platform. For easiness, you can also connect to the WiFi interfaces (OpenWrt and GL-iNet SSID) and configure the routers form your personal laptop. The root password for GL-iNet is helloworld, while no password is set for OpenWrt.
-. Before you Leave
Before you leave, make sure to go through the following steps.
- Gracefully shutdown the raspberry pi modules with
shutdown -h now. - Switch off the TP-LINK and remove the USB power cable from the GL-iNet.
- Power off the laptop.